For the last few days I’ve been obsessed with making all my fit adjustments to as many patterns as I can stand before I lose the urge. It’s making me a little crazy since every one is different. First I have to figure out which pattern size to start with. Then I begin at the top - the shoulders, front and back - then work down to the armholes, neckline, and body. Last I fix the sleeve and occasionally any small pieces (neckband, facings, etc.) if their dimensions were affected by any of the other adjustments.
Sometimes this process is really straightforward and all I have to do is trace over my shoulder slopes and armholes onto the main pieces. Sleeves usually need the caps re-drawn and the length shortened. One pattern I worked on today needed a whopping 4” removed from the sleeve! I might have little T-rex arms but someone must have orangutan arms instead. Yeesh.
I ran into a couple of patterns that weren’t quite as easy however. The Grainline Alder Shirtdress threw me a little with a back yoke that overlapped the front shoulder by an inch. I wasn’t sure how to slope the shoulders when the shoulder “seam” was in the middle of the yoke piece. So it was out with my fitting bible, Fitting and Pattern Alteration: A Multi-Method Approach to the Art of Style Selection, Fitting, and Alteration (2nd Edition), by Elizabeth Liechty, Judith Rasband, and Della Pottberg-Steineckert. (This beast is a doozy and apparently there’s a 3rd edition, but good luck finding a copy for a decent price. Luckily I’ve had mine for several years now.) Naturally the solution was there:

You have to take some off the shoulder by splitting and overlapping and take the rest off the front and back where the yoke attaches. So I did:

Hopefully that will fit properly. If it’s not enough I can take in a little more on the fly as I’m sewing it. This method will also help prevent the gapping at the back of the armhole that often happens on sleeveless garments with my rounded shoulders. Notice I widened the shoulders to give me more coverage. Usually I have to make them narrower instead. You just never know! I’ve never sewn a Grainline Studio pattern before so it’s a whole new ballgame. At least if I’ve widened the shoulders too much I can trim the excess. Much more complicated to add fabric if there’s not enough.
Another indie designer I haven’t sewn with before is Sew Liberated. The bodice on this sleeveless jumper/dress, the Metamorphic Dress, needed the usual shoulder sloping but also needed the shoulders moved in a little toward the centre. Otherwise they would be falling off! You sure need to measure absolutely everything carefully, don’t you? This one wasn’t too hard to do:

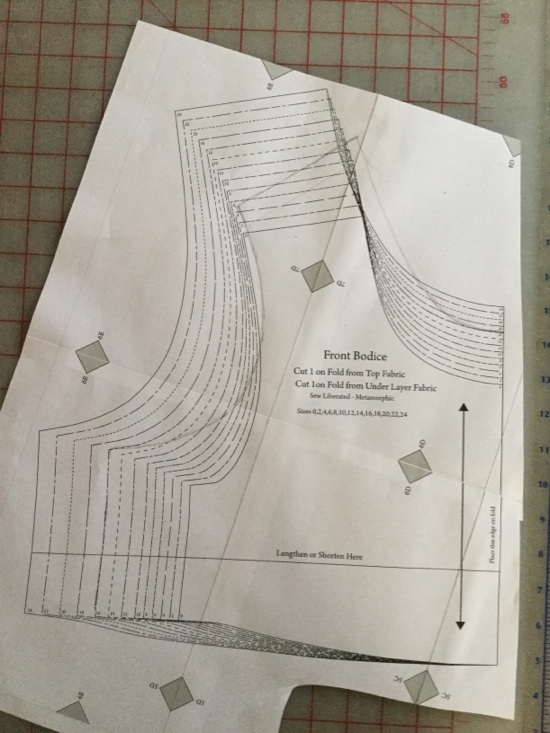
See how many sizes this dress has! Makes it a little difficult to find your size lines but it’s lovely to have such a wide range. I’m looking forward to making this one - although I’ve switched up the fabric choices. I discovered that the fabric for the underlayer needs to be viewable from both sides so that will be the black linen. The top layer will be my over-dyed black & white rayon print, which is one-sided. My dyes penetrated through but the original print does not.
I’ve also worked on several other patterns but the last one, V1456, is giving me more trouble. It’s a Sandra Betzina Today’s Fit pattern and I’ve never tried one of hers before either. The basic block they’re drafted on is quite different from other Vogues. Even the pattern tissue is different - it’s white and very wrinkled from the factory folding and needed careful ironing before it was useable. This tunic/jacket has kind of armhole princess seams with the side front and back pieces joined so there are no side seams. To get this to fit I thought I was going to have to make a bodice muslin but I ended up tracing the pieces onto new tissue instead. Then I taped them together, did the adjustments I thought I needed and tried the results on Debbie Double. It was actually a lot closer than I expected at first glance. Props to Sandra Betzina who obviously has a clue how older bodies are different from younger ones! A little more finessing and now I think I’ve got it right. Maybe. Fabric is different than tissue but it helps that I’m becoming really familiar with the flat shapes that need to go together to fit on my own unique rounded shape.
After half a dozen patterns I haven’t run quite out of steam yet. So I’ll carry on until the temptation to start chopping into fabric gets to be too strong to ignore! Might as well run with it while I can, eh? The more I do now the easier it will be to just get on with the next steps of cutting and sewing without having to do all this fiddly measuring and paper cutting and gluing first.
So in other news, I don’t know what the weather is like where you are. I know we aren’t having snowfalls like some places but here it’s been raining a lot and still not feeling like seasonal temperatures either. It’s cold as well as soggy wet! Yuck. Even my crab cactus still thinks it’s November:

It’s very pretty though so I guess I really shouldn’t question the re-blooming. My poor veggies etc. aren’t getting anywhere near to being planted in the garden yet either. There’s not enough room under the lights in the basement for the seedlings now so every day the more cold-tolerant ones go out into the greenhouse for the day and back in again at night. Too cold to leave them out overnight quite yet. Unfortunately there’s 9 trays of flats now and more coming so it has become a rather tedious ritual. We call it the Daily Schlep. Out. In. Out. In. One. Single. Tray. At. A. Time.
By the way, have I mentioned that I’ve definitely figured out how to successfully keep Japanese indigo seeds for more than one season? These are notoroisly poor keepers but I’ve tested this for 3 years now - store them in paper envelopes in dry sealed heavy-duty ziplocs in the freezer. The germination was good even with the oldest seeds. See?

These were saved from 2015 and 2016. I planted them rather more thickly than I should because I wasn’t sure about them and because I needed extra to share with another dye garden. I also have seedlings from the 2017 seeds. This is a triumph! Now I don’t have to worry if something happens and for some reason I don’t get good seeds one year, I’ll have backups.
3 comments:
So where oh where do you ever find Japanese Indigo Seeds? Love your blog I've been reading but not commenting.
Good to have you comment, Aleta! I got my seeds years ago from a mail order source. No idea what variety they are but they do give blue and I save my own seeds every year. I have some spare seeds this year. If you are desperate PM me and we’ll talk. (Addy link in my profile.)
I am desperate, but I live in northern Alberta so I am really wondering if this would be a wasted effort. I am new to using my own dye but have started some black hollyhocks this spring. So will start with that. We still have 3 feet of snow on our front lawn. Your garden looks amazing as does your new cardigan.-Aleta
Post a Comment