This is me beckoning to you like a human Maneki Neko...
Damselfly’s Delights
Being the continuing story of my creations and curiosities.
Tuesday, February 05, 2019
Hello and Goodbye
This is me beckoning to you like a human Maneki Neko...
Saturday, February 02, 2019
Question & Answer Time
Sue asked a couple of great questions about sewing the Ingrid bra. I really don't think it would be feasible to try to sew the centre front seam earlier in the process to avoid having a raw seam on the back. The top and bottom edges of that seam are where the elastics (FOE at the top and band elastic at the bottom) come together at acute angles. You couldn't get those angles correct without sewing the seam after the elastics are applied. There's no real advantage to hiding that front seam anyway since the rest of the seams are also exposed on the back as well. I guess you could hide them if you made completely separate lining and cups before joining them with the elastics but as far as I can figure you still can't avoid sewing the centre front seam last. Maybe my 3-D brain isn't functioning and I'm missing something?
Sue's second question asks about taking in the top cup. Nope, the only modification I did was to bring the strap attachment point on the cup in towards the centre by 3/4" following Beverly's tutorial here. This keeps the straps up better on my narrow sloping shoulders. The centre front seam doesn't tack close to my chest like an underwired bra but fits more like other non-wired bras I've purchased and is raised a little away at the bridge. However I do get reasonably good support and a whole lot more comfort than with wires. If it matters at all, my final Ingrid bra size (that fits better than any bra I've ever owned!) is BCD 4.25" X 32" band. I now have No Idea what that is in regular bra sizes! Heh. Ingrid has over 200 sizes including a lot that don't exist in RTW so it's perfect for those hard-to-fit or between-sizes girls.
Thanks for your kind words, Barbara!
And thanks for not being bored yet, Alison! There are more bras to come. Also, I apologise in advance if switching over to a new blog platform is going to be troublesome for you or anyone else who hangs out with me. You might be interested that I've already created an embryonic blog on WordPress.com but I'm not giving out the URL. Yet. I have a lot more learning, experimenting and tweaking to do before it will be ready for prime time. I promise to give you a chance to test the commenting procedure and hopefully we'll be able to find a setting or something that will allow you to do it easily. As things stand right now, I have the opposite problem than you - I mostly can't comment on any Blogger blogs from my iPad which is my primary computer these days. Pardon me for a moment whilst I go on a rant...
Blogger. You are my nemesis! It's not like I haven't given you the benefit of the doubt here. I've been flitting about this old Damselfly's Delights pond for nearly 14 years now. (My Blogiversary is May 5.) Fourteen YEARS!!! 1834 posts as of this current one. That's a heck of a lot of babbling, huh? However, it's been getting harder and harder to do what I want with my blog. There has been no update of the post editor in Stinkin' Forever! There's no iPad or iPhone Blogger app. The web-based post editor doesn't work properly with the iPad either. My third-party app Blogo, which was working just fine is now broken again so that I can't post with photos. The developer is so overwhelmed that I can't even get into his help page to report it. Last time this same thing happened, it turned out to be Apple's fault when they changed something somewhere in the iOS and I'm betting that's what's happened yet again. They sure don't warn anybody ahead of time. I can post to Blogger from my desktop computer if I first boot it up, hook up my iPad with all my photos to it, transfer the photos over to the desktop and then go online to the post editor to input my text and photos before finally hitting post. A lot of steps and I have to be at home to do it. I would much rather just use my iPad that I carry around with me nearly all the time and is my only camera. I can do almost everything else easier and better on it and do it anywhere that I can get wifi! Why can't I post to my blog easier too? Your guess is as good as mine. I bet you've noticed my blog posts have been getting further and further apart though, haven't you? If it's not easy I'm not going to do it. Hello, Instagram. You are easy. Too easy. Ahem.
But I don't want to stop blogging so in retaliation I've been exploring my other options and WordPress seemed like it would work for me. Confusingly there are actually two entities called WordPress: WordPress.org which is the more powerful self-hosted opensource website design software and its offshoot, WordPress.com, a fully hosted site with security and backups included. The latter is obviously what I'm looking at more fully. There is a limited free level with the option to upgrade to a paid subscription. As long as the ad banners aren't too annoying, I'm not adverse to having them so I'm starting at free. And believe me, though some things are similar to Blogger, some things are not so there's going to be a learning curve to get through. But there is an iPad app! And the blog is automatically optimally configured for computer screen, tablet or phone views which I like. Can I say all this on here or is Blogger going to shoot me down for trash talking it? LOL!!! I'll stop now and not mention it again until I have something concrete to tell you. ...end rant.
Meanwhile, we're waiting for a cold snap to hit tomorrow. I ran out and picked some of the wee overwintering greens from my garden before something happens to them. Like they get covered in snow or freeze to death. There's a actually few tiny bites out there:
Clockwise from the top: kale, chard, mizuna, bok choy, purple sprouting broccoli and (middle) corn salad. The kale hasn't budded out yet but the garlic is coming up. The snowdrops and crocuses are starting to bloom here. Yeah, I know. Those caught in the Polar Vortex are cursing me now. Snicker! Although we may get a little of our comeuppance very soon. Winter ain't over till she's over!
Friday, February 01, 2019
Sweat Shop
I should have lightened it up so you can actually see it! The outer fabric is a slightly stretchy nylon sport fabric with a bit of texture so I lined it in black cup lining (aka marquisette). It was a little tricky to sew and I noticed that the cups wrinkle a little on the body. Perhaps I should have used some fusible webbing to hold the layers together? Bra-makers Supply (BMS) recommends Misty Fuse which is very lightweight but I don’t have any yet. I’d love to see a tutorial on different methods of lining a bra since I’m not very experienced with that and am not especially happy with my previous results. I obviously prefer the single layer of the Duoplex that I’ve had good success using.
I’m trying to keep everything together and oriented correctly while also trying to batch process as many seams at a time as I can. They are tiny and fiddly! And it saves much changing of stitches and feet.
- Fabric choices are of course up to you but remember that less stretch in the cups is more supportive and can actually be more comfortable.
- Gather all your supplies including findings before you start. There are a lot of different items and you want to make sure you have everything you need.
- Play a game of Tetris with your pattern pieces to economise on fabric usage. But pay close attention to your DOGS (Direction of Greatest Stretch) or the bra won’t fit.
- Take your time and cut carefully and as accurately as possible. There’s not a lot of room for error on these little snippets of fabric.
- I use a rotary cutter but if you prefer scissors, trace around your pattern pieces and cut off just inside your lines so you aren’t adding any extra width.
- Keep your pieces oriented correctly so you know which way is up and which piece connects to which piece. It’s really easy to get mixed up between lefts and rights and ups and downs.
- Accuracy in sewing is important. 1/4” seams and 1/8” topstitching is very small.
- If the pieces don’t want to feed when you start a seam but get sucked up into the throat plate, try holding both spool and bobbin thread behind the presser foot and pulling gently on it until it goes by itself.
- Watch your stitch lengths and widths. Also it’s easy to forget to shift from zigzag to straight stitch or multi-step zigzag to lightning stitch.
- Press seams carefully and watch out for too hot temperatures. Synthetics are easy to melt.
- I use a tailor’s ham and my Thom-made cup ball (dubbed the Chest Piece because it looks like a pawn!) to press the very curved cup seams. A rolled towel or the end of a sleeve board might work instead.
- Some of the elastics need to be stretched in certain places to snug up the fit. The fold-over elastic goes on the top edge of the cup and up the strap to finish these edges - no need to stretch this one at all. The bottom band elastic needs to be stretched gently along its whole length. The underarm/strap elastic doesn’t stretch on the strap but does need to stretch somewhat at the curve under the arm to snug it up and then just gently across the back band.
- When sewing the bottom and underarm elastics, orient them on the right side of the fabric with the soft fuzzy side up and the picots away from the edge of the bra. When you turn it under for the second pass, the soft side will be against your skin and the picots will peek out at the edge. It seems counterintuitive so it’s easy to get this wrong.
- Before you sew the strap elastics to the bra, assemble them correctly first. Sew the loop that secures the sliders then thread the ring on and push it towards the middle of the elastic. Thread the raw end through the slider trapping the ring.
- Check the width of the hook & eye pieces over the end of the band with the strap elastics held in place. If you need to adjust anything, it’s easy to shift the strap elastics in or out a little at this point until the hook & eyes will fit correctly. Then sew the strap elastics on and trim any excess at the underside.
- The end of the fabric strap goes through the ring and gets stitched in place.
- The hook & eye pieces go on. The longer eye piece goes on the left as you are looking at the right side of the bra back. The hooks go on the right.
- Stitch the hook piece from the back side so you don’t get scratches on your machine. Depending on your machine, you might need to move the needle over or use a zipper foot to get in there to sew it down without running over the hooks.
- On the Ingrid bra, the last seam is the centre front seam! It’s completely made in two halves that only join at the very end. You’ll want to make sure the seams line up neatly and that you backstitch well at each end since that seam gets a lot of stress.
This makes it much easier to get an even topstitching. You might have something similar for your machine.
Back to the sweat shop...er, bra factory.
Sunday, January 27, 2019
January Flying By
He totally loves it and has barely taken it off since it came out from under the presser foot! This pattern (mostly) is the North Star Hoodie/Pullover from Love Notions although I used the Thread Theory Finlayson sweater to adjust the depth, width, armholes and sleeve cap dimensions. I used the Finlayson because it already fits him to perfection and the North Star seemed like it would be too baggy in the armhole area. The fabric is a double-faced knit in a charcoal marl on one side and plain grey on the other so I used the grey as accents on the marled main body. I interfaced the collar which was a good idea since it gives it some body to prevent it from being too floppy. He definitely likes a “popped” collar! The zipper was in my stash and has grey plastic teeth on a black tape and an opening style which didn’t matter because I cut it off anyway. The longer length meant that it was easier to sew and I was able to pop off the excess teeth that would have been caught in the seam with wire snippers. It’s a heavy-weight zip so that made it much easier to sew without breaking a needle. Now of course he wants more of these. We’ll be on the lookout for suitable fabrics in future.
Sunday, January 13, 2019
Yet Another Shirt
Hello, my dears! Yes, I’ve been somewhat busy. My sister was visiting for a week or so and you know how that goes, right? Island Girl in the City! Shopping for things she can’t buy at home, visiting places she wanted to see, going to the dentist and the hairdresser, talking-talking-talking...you get the picture. We did have a good crafty session or two in the studio where I managed to finish the last of my previously cut-out sewing projects, another shirt for Thom:
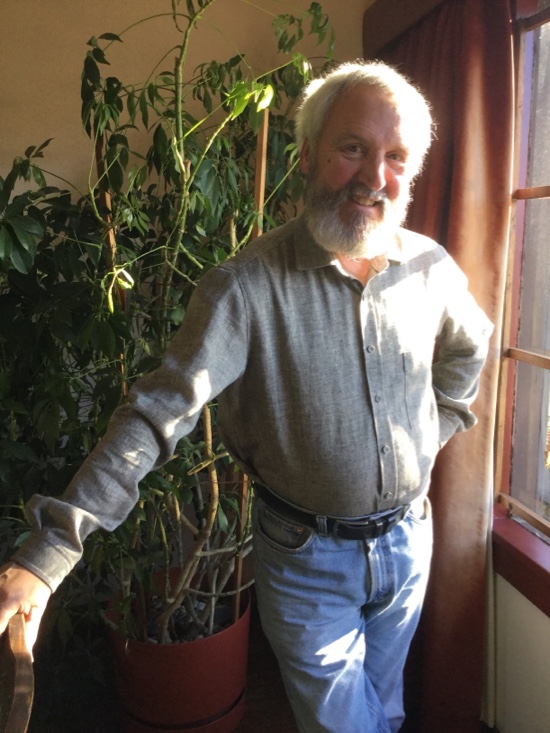


The fabric is a lovely soft cotton/linen herringbone twill (a black cotton warp and a half-bleached linen weft). He picked it out specially for a shirt so even though I was tempted to sew something for myself, I made the huge sacrifice (heh!) and sewed yet another Fairfield Button-up. This time I made a squared pocket, cuffs and ends on the sleeve plackets. Gotta keep each one different! He put it on the minute I was done and barely took it off for the next several days. It’s already gone through the laundry. I think that means it’s a hit, huh?
I was happy to be able to use my new straight stitch foot and throat plate for this project since it’s all straight stitching up until the buttons and buttonholes at the end. Yes, I finally got the hardware to attach to the throat plate that mysteriously didn’t come with the darn thing. My vendor (Toews Sewing in Abbotsford, BC) was very helpful and managed to find all the little bitty pieces for me, package them up and mail them including all the tiny little screws and an extra bobbin cover too. Only took me a few minutes and one of Thom’s wee screwdrivers to fix it:
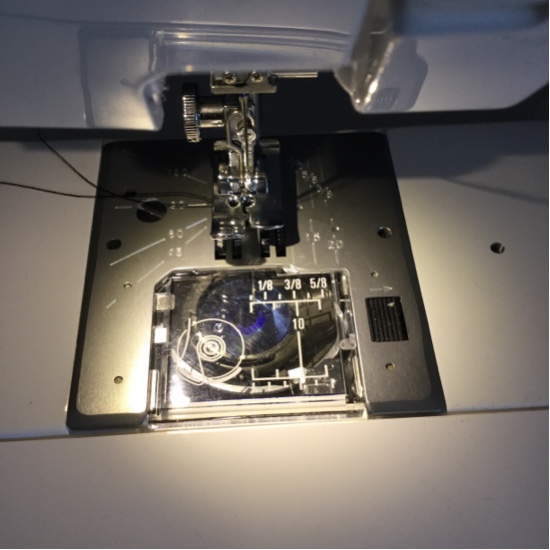
I think this setup gave me more control over my seam allowances and top-stitching. I’m just so pleased because I was never able to get many extra feet or other accessories for my old machine. They were expensive at the time and I didn’t have a lot of spare cash. Also snap-on feet are so much quicker and easier than screwing them on and off. I’ve taken advantage of many of the specialty feet for my new machine and have been pretty happy with the results. On this make I also used my new button foot that has a rubbery coating and a wide open space so it holds the buttons, even little shirt buttons, secure and you can easily see what you’re doing. Definitely worth the price of admission. I also had to make the bottom button on the front of his shirt different because I was one button short. It tucks into his jeans so you can’t see it anyhow.
Anyhow, it worked well and now I’m considering my next pile of projects. Lots to choose from but first I need to do some assembly and fitting changes on a few patterns. I’m really finding batch processing is working well for me. As long as I make a point of finishing up the pile before I make a new one! In the past, I’ve left things cut out but not sewn too long so that my needs and tastes changed before the garment got made. Not good. However, I’ve been very consistent in the past couple of years and even though it might take a couple of months between cutting out and sewing up, it does all get done in the end.
I’ve also been concentrating more on making things for Thom since I have plenty of wearing options and he doesn’t. I’ve now made 5 shirts and he still could use one or two more. Plus the pullovers/sweatshirts he likes to wear in winter (when he isn’t wearing the handspun sweaters I made hime) are pretty much down to a single one. That’s the next thing on my agenda anyway so he at least has another to switch off with. And then there’s the Peacoat Project. I have two new books on tailoring now which should boost my confidence somewhat. This is going to be Slow Sewing for sure. Stay tuned.
The weather has been pretty mild and alternating rain and sun. We’ve been trying to get out s much as possible for long walks. Here’s the scene yesterday on the Fraser River walk:

Monday, December 31, 2018
Year of Going Deeper
After yesterday’s pondering, I saw a post by David from Raptitude.com entitled “Why The Depth Year Was My Best Year”. And of course it resonated with my current situation exactly! He of course started last year so, no surprise, I’m a bit late to the party but it’s not as if this whole subject hasn’t been on my mind for awhile now. The essence for me is that instead of always going for the new thing, take what you already have and explore it in depth. I’ve kind of been heading that way anyhow in trying to use stuff that’s already in the stash, not taking any new classes, buying way less craft books, concentrating on a few skills and not starting so many new projects until the previous ones are finished. I need to take it further though into other areas of my life. I’m pretty good at being in the moment and appreciating where I am right now, but I can always improve, no? Yes! And “divestment” still fits in there as well, just a little less starkly. Got my theme for 2019 now. Thanks, David.
Meanwhile, it’s cold and sunny on this last day of December 2018. Here’s my smiling face and an OOTD for you:
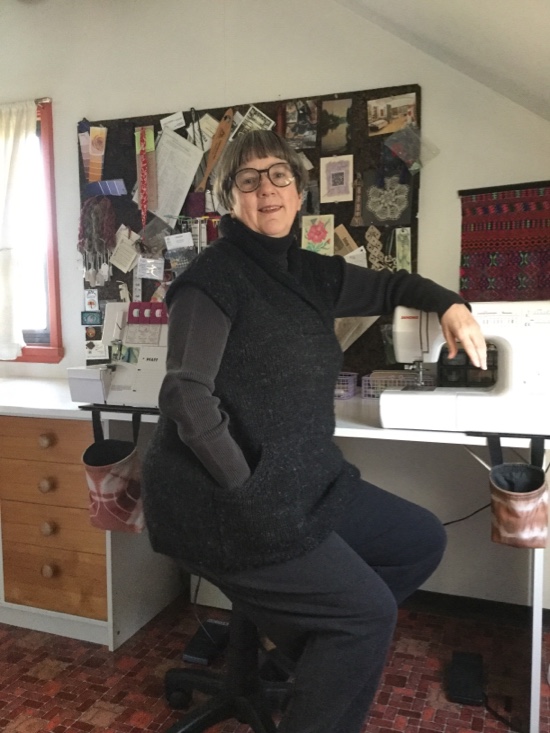
The turtleneck is ancient and faded but it still gets plenty of wear when it’s cold in my house. The baggy pants are nearly as ancient, cheerfully referred to as my Clown Pants. And the sweater is my Licorice Tunic Vest (Ebony by Cristina Ghirlanda) in handspun wool. It’s in aran-weight yarn on big needles and very toasty. I’ll be donning more woollies before heading out for a walk after lunch.
Bye-bye, 2018!!
Sunday, December 30, 2018
Backwards & Forwards
My Instagram Best Nine - just in case you missed it!
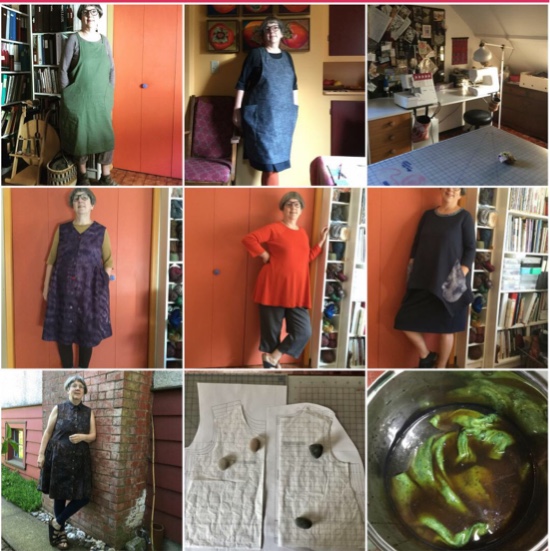
In this in-between week most people spend some time reviewing the year that has passed and looking to see what’s coming up in the next one. I called 2018 the Year of the Slug in recognition of my efforts to slow down, take time, step back from depressing world news and nest. I really thought I was doing a good job of acting slug-like: lots of time spent in the hammock as well as the garden and the studio. I actually read 165 books! That was 15 books past the 150 I had challenged myself with on Goodreads. Yikes! All frivolous ones naturally. That’s just the way I roll.
However I surprised myself even more by counting 41 projects finished! And here I thought everything was taking forever and I made lots of mistakes especially in my knitting that had to get pulled out and started over. It took 6 months just for the Lacca Laneway dress alone. And then there was the old sewing machine that wouldn’t feed and the leaking iron too. Not to mention the summer heat and smoke that made my studio unpleasant to work in for several months. Amazing that so much managed to get to the finish line in spite of the difficulties. I am nothing if not persistent!
So what did I make? 1 woven blanket, 1 sweater’s worth of spun yarn, 5 sweaters, 3 pairs of socks, 2 shawls, 1 coffee cosy, 8 tops, 11 tunics/dresses, 3 pants/shorts, 2 skirts, 3 bras and a pyramid. 11 items were for Thom, the blanket for both of us and the pyramid for his mom. Otherwise it was all for me-me-me! Interestingly the number of things I’ve been making for Thom has been rising quickly. I guess I’m inspired by how much he actually has been wearing the things I’ve made him. I have at least 4 more for him waiting in the queue too.
Speaking of me-mades, here’s my last one of the year, Katherine Tilton’s Butterick 6138:

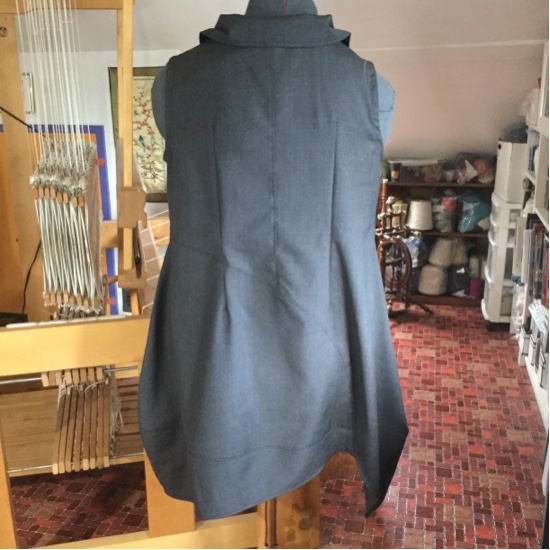
It’s actually much closer to black than the medium grey it looks here. I apologise for putting it on Debbie Double but I was too lazy to get dressed and trying to catch the elusive winter light so you could see the details on this dark plaid wool suiting. I already made this tunic or dress or vest (what would you call it?) in natural linen for summer so this is my winter version! This is project number 13 for my new Janome sewing machine and the first for my new CHI iron. The suiting is quite crisp so hard to get a really smooth pressing on the seams. They look good when steamed but slowly go right back to where they want to be. Good old worsted wool! I even washed and dried this fabric in the machine before cutting it out and it didn’t even notice. No dry cleaning for this garment.
So now we look forward. What’s coming up? Darned if I know for sure! I haven’t got a word or a theme for 2019 yet. Although I have been thinking more and more about starting to unload some of the supplies around here that I know I’m not ever going to use. The hard part is just going through it all and making decisions. Not that I have trouble knowing what I don’t want to keep exactly. Just that I don’t really know how to get rid of it in the best way. I do know that back in the day I was very grateful for free or cheap supplies from fellow crafty people who were downsizing their own stash. And I would like to do the same for someone else. There is a lot of potential tied up here that would be lovely to let go to another who could use it rather than have it sit here gathering dust. Unfortunately I’m not at all interested in listing any of it online or having a garage sale or anything that takes time and effort. I just want it gone, either for free or a small donation and then somebody else can figure out what to do with it. I’ve already got someone willing to take the lacemaking stuff. Now I need to think about the beadwork supplies. Much money invested in this lot so I can’t just dump it. Oh, and my 14-year-old granddaughter just got her first sewing machine so she can have first pick on excess fabrics. More to ponder as time goes on. Hey, maybe I just found my word for the year:
DIVESTMENT
Sounds a bit ominous though, doesn’t it? I have no plans to get rid of everything!


